
How to Reduce Image File Size Without Losing Quality
Seven proven ways to shrink image files: resize dimensions, pick the right format, tune quality and strip metadata, with before/after file sizes.
By PictureToLink Team · · 9 min read
Facts checked against official sources on
On this page
- Why image files get so big
- 1. Resize to the size you need
- 2. Choose the right format
- 3. Lower quality a little
- 4. Strip metadata
- 5. Use WebP or AVIF where supported
- 6. Crop away what you do not need
- 7. Reduce colours for simple graphics
- Online, Windows, Mac and phone options
- Mistakes that make files bigger
- How small is small enough?
- Next step
To reduce image file size without visibly losing quality, first resize the image to the largest size it will actually be shown at, then save it in a suitable format (JPG or WebP for photos, PNG or WebP for graphics) at a moderate quality setting, and strip the metadata. Resizing does most of the work: in our tests, scaling sample photos to 1920 pixels wide cut them by 56% to 74% before any other change. A free in-browser tool such as our image compressor does all of these steps in one go.
Why image files get so big
Three things decide how big an image file is:
- Pixel count. A modern phone photo can be 4000 pixels or more across. Every pixel has to be stored, so doubling the width and height roughly quadruples the data.
- Format and compression. The same picture can be a few hundred kilobytes as a JPEG or several megabytes as a PNG. Formats compress in different ways, and some compress much better than others for a given kind of image.
- Detail and noise. Busy scenes (foliage, gravel, crowds) and grainy low-light photos are harder to compress than clear skies and flat colours.
Extra data such as camera metadata and colour profiles adds a little on top. The good news is that most images are far bigger than they need to be for screens, so you can usually shrink them a lot with no visible change.
How much each step saves
We ran sample photos through our own upload pipeline (sharp/libvips) with different settings. These are measurements on our sample files, not promises for every image, but the pattern is consistent:
| Setting | Photo A: 3024 × 2016 JPG, 1.57 MB | Photo B: 4032 × 2623 JPG, 380 KB |
|---|---|---|
| Same size, JPEG quality 90 | 1.42 MB (9.3% smaller) | 344 KB (9.6% smaller) |
| Same size, JPEG quality 80 | 1.36 MB (13.5% smaller) | 335 KB (11.8% smaller) |
| Same size, JPEG quality 68 | 931 KB (42.1% smaller) | 217 KB (42.8% smaller) |
| Same size, WebP quality 80 | 1.35 MB (13.9% smaller) | 197 KB (48.1% smaller) |
| Resized to 1920 px, JPEG quality 80 | 450 KB (72% smaller) | 100 KB (73.7% smaller) |
| Resized to 1280 px, WebP quality 80 | 224 KB (86.1% smaller) | 37 KB (90.3% smaller) |
Resizing beat every quality and format change on its own. Combining a sensible size with a modern format gave the smallest files.
1. Resize to the size you need
This is the single most effective step. If a photo will be viewed on a phone, in a chat window, in an email or in a blog post, it never needs the full resolution your camera captured.
Useful sizes for the longest side:
- 1920 px: fills a typical laptop or desktop screen. A safe choice for photos people may open full-screen.
- 1280 px: plenty for images inside articles, emails and forum posts.
- 800 px: thumbnails, small inline images, product photos in narrow layouts.
Keep the original. Resizing down is permanent for that copy, and you may want the full-resolution version for printing or cropping later.
Resizing also helps with the quality trade-off. A smaller image at quality 80 usually looks better at a given file size than a huge image squeezed down to a very low quality setting.
2. Choose the right format
The wrong format can make a file many times larger than it needs to be:
- Photos: JPG or WebP. Saving a photo as PNG keeps every pixel of noise losslessly and produces a big file.
- Screenshots, logos, diagrams: PNG or WebP. JPEG blurs text and sharp edges.
- Animations: animated WebP or a short video rather than GIF.
Our sample screenshot (1366 × 900) shows how much format matters for graphics: 2.3 MB as the original PNG, 712 KB re-saved as an optimised PNG with identical pixels, and 126 KB as WebP at quality 80. Our guide to image file formats explains when to use each one.
3. Lower quality a little
JPEG and WebP have a quality setting, usually on a scale of 0 to 100. The relationship between quality and size is not linear: the top few points cost a lot of bytes and add little that anyone can see.
In the table above, dropping from quality 80 to 68 roughly tripled the saving on both photos. Whether that is acceptable depends on the picture. Check the result at the size people will see it, and watch smooth areas such as skies and skin for blockiness or banding. If you see it, go back up a step.
A practical approach:
- Start at a quality around 80.
- Compare with the original at 100% zoom on the parts that matter.
- Lower the quality step by step until you notice a difference, then go back one step.
Lossy compression discards detail permanently, so always work from the original. Our explainer on lossy vs lossless compression covers why repeated re-saving degrades images.
4. Strip metadata
Photos from phones and cameras carry metadata: camera model, date and time, settings and often GPS location. It is usually small compared with the image data itself, so the main reason to remove it is privacy rather than size. Still, there is no reason to ship it with every copy you share.
Most compression tools remove metadata when they re-encode. Every upload to PictureToLink has all metadata discarded, and the image is rotated the right way up first so it does not end up sideways. To strip metadata and keep the file on your device, use our EXIF remover.
5. Use WebP or AVIF where supported
WebP and AVIF are newer formats that usually produce smaller files than JPEG and PNG. The MDN image format guide recommends preferring them for raster images on websites, with a JPEG or PNG fallback where older browsers matter.
Where they make sense:
- Your own website or blog: yes, ideally WebP or AVIF with a fallback.
- Sharing by link: WebP works in all current major browsers.
- Email attachments, online forms, printing: stick with JPG, because many apps and form validators still expect it.
The saving varies with the image. In our tests, WebP at quality 80 was 48.1% smaller than the original JPEG for one photo but only 13.9% smaller for another. Screenshots gained the most.
6. Crop away what you do not need
Cropping removes pixels as well as distractions. Trimming empty sky, a cluttered border or the browser window around a screenshot can cut the file size noticeably and makes the picture clearer. Crop before you resize so the remaining subject keeps as much detail as possible.
7. Reduce colours for simple graphics
Logos, icons, charts and interface screenshots often use only a handful of colours. Reducing a PNG to a limited colour palette can make it much smaller while still looking identical to most viewers. In our tests, palette reduction took the sample screenshot from 2.3 MB to 525 KB, compared with 712 KB for a lossless re-save. It is a lossy step, so check gradients and soft shadows for banding. PictureToLink's "Smallest file" setting does this for PNG uploads.
Online, Windows, Mac and phone options
Online, in any browser. Our image compressor runs entirely in your browser, so files are not uploaded. Choose an output format (JPG, WebP or PNG), set a maximum width and a quality, and download the result. It works on phones as well as computers. If you need a specific size, such as for an application form, use the reduce image size in KB tool to aim for a target.
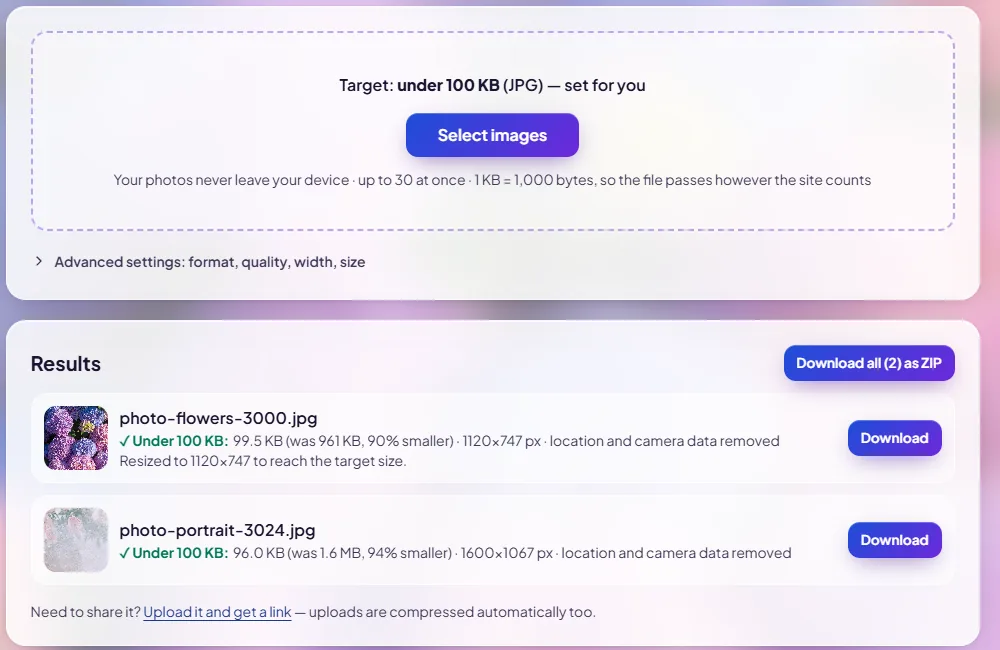
Two of our test photos on the compress to 100 KB page. The detailed one had to be made smaller to fit; the simpler one kept 1600 px.
Mac (Preview). Apple's guide to resizing images in Preview describes choosing Tools > Adjust Size, selecting Resample image and entering smaller values for the size or resolution. Preview shows the resulting file size at the bottom of the window before you confirm. To adjust JPEG quality, choose File > Export, pick JPEG from the Format menu and use the quality option, as described in Apple's guide to converting image file types. Our Mac compression guide has more detail.
Windows. Paint can resize an image by percentage or pixels, and our guide to reducing image size in Paint walks through it. For format conversion and quality control, the in-browser compressor is usually quicker.
iPhone and Android. Phones do not make it obvious, but there are free ways to do it without installing anything. See our step-by-step guides for iPhone and Android.
When you are sharing by link anyway. Uploading to PictureToLink compresses images automatically. Pick a Resize option (for example 1920 px or 1280 px) and a Compression level before you upload, and optionally Convert to WebP.
Reducing many images at once
You do not have to process photos one by one:
- In the browser: the image compressor accepts several files at a time and applies the same format, width and quality to each.
- When sharing by link: the PictureToLink uploader takes up to 20 images at once with the same options, and Copy all gives you every link in one go.
- On a Mac: Apple's Preview guide notes that you can open several images in one window, select them all in the sidebar and choose Tools > Adjust Size to resize them together.
Mistakes that make files bigger
- Saving at quality 100. It produces much larger files than quality 90 with no visible benefit for normal viewing.
- Converting a JPEG to PNG. The PNG keeps every JPEG artifact and is usually several times bigger.
- Upscaling. Enlarging a small image adds pixels without adding detail, so the file grows and looks soft.
- Re-compressing a compressed file. Each lossy save loses detail, and the size saving shrinks each time. Go back to the original instead.
- Using JPEG for screenshots of text. You need a high quality setting to keep text readable, which cancels out the saving. PNG or WebP is usually smaller and sharper.
How small is small enough?
There is no single right number. Aim for the smallest file that still looks right where it will be seen, and check any hard limits first:
| Where the image is going | What to aim for |
|---|---|
| An online form with a stated limit (for example 50 KB or 200 KB) | Just under the stated limit. Our 100 KB compressor and the other KB tools target common limits. |
| Email attachments | Keep the total under your provider's limit, with room for encoding overhead. See our guide to email attachment size limits. |
| Chat apps and forums | Resize to about 1280 to 1920 px. Size limits vary by platform. |
| Your own website | As small as possible without visible loss, sized for the space it fills. Every image adds to page load time. |
| Printing | Do not shrink. Keep the full-resolution original. |
If you have resized, chosen a sensible format and quality, and the file is still too big, the image is probably very detailed. Try a slightly smaller size or a lower quality, and accept some loss, or send it as a link instead of a file.
Next step
Open the image compressor, drop in the image you need to shrink, set the maximum width to 1920 px and the quality to around 80%, and compare the before and after sizes. Lower the width before you lower the quality.